With the increasing popularity of GitHub Actions people around me start to show more interest but don’t exactly know where to start. Getting it up and running might feel like a big step though this article will demonstrate that it’s very easy!
This article won’t discuss which of CircleCI, Bitrise, GitHub Actions or other platforms is better as CI or how they compare. I used them all and they can all do the basic stuff I’m going to demonstrate in this article. However, recently I configured GitHub Actions for some open-source projects and commercial ones. The documentation, extensibility with plugins and the fact that you have everything in one place when using GitHub as your repository is really great.
When you start with GitHub actions there are a couple of things you need to know:
- GitHub Actions are configured with Workflows
- Workflows are written in yaml
- Everything you do happens in a folder named
.githubin the root of your repository, This is also where workflows live.
What is a workflow?
A workflow is a configuration file in your repository that is triggered by an event that will run tasks defined by you.
The documentation of GitHub explains very well what a workflow contains:
“Workflows must have at least one job, and jobs contain a set of steps that perform individual tasks. Steps can run commands or use an action. You can create your own actions or use actions shared by the GitHub community and customize them as needed.”
Source: configuring-a-workflow
Basic workflow
Let’s create a workflow that runs the tests of your Android project.
1) Create a folder in the root of your project named .github with a folder inside named workflows.
This is where you’ll be putting all your workflows.
2) Now let’s add the following workflow in there. Create a file in the workflow directory and name it however you want (for example: ci-{appName}.yaml where appName is replaced with the name of your app). Mine is ci-konfetti.yaml for example.
1name: CI23on: push45jobs:6 run-test:7 runs-on: ubuntu-latest8 steps:9 - name: Checkout10 uses: actions/checkout@v21112 - name: Run tests13 run: ./gradlew test
This is a very basic workflow named CI containing one job named run-test. The job runs two steps in consecutive order:
- Checking out your repository (Action)
- Run tests in the root directory of your repository (Command)
As mentioned earlier in the quote above, a step can either be a command (bash) or an action. An action is basically a plugin written by you or someone else that can easily be reused. The checkout step is such an action, open-sourced by GitHub here.
When you push this workflow to your repository it will look like this:

But there’s more to it. How does the workflow know when to run?
On line 3 we specified the workflow to run on each push to the repository, it will checkout the specific commit of that push. Instead of push there’s a very wide variety of events to listen and trigger your workflow with. You can find more about that here: events-that-trigger-workflows
Choosing system image
For each job you need to specify on what system it should run. This workflow is running on ubuntu-latest, this comes preinstalled with a bunch of things. Since our workflow is running successfully without the need of any extra configuration the ubuntu system image has everything we need for our Android project.
More on what images are available and what they have preinstalled here: software-installed-on-github-hosted-runners
Caching
Above setup works pretty well. However if you happen to have a large Android project with a lot of dependencies you might want to improve this setup by adding caching. Every time a workflow is triggered it will start with a clean image from scratch. Nothing is cached, the current workflow doesn’t know anything of the previous workflow. Since there is no Gradle caching in place every build will be seen as a clean build.
Luckily there’s an out of the box solution (GitHub Action) for this, again open-sourced and provided by GitHub. More on that here: https://github.com/actions/cache
Now let’s put this action in-between the already defined steps.
1- name: Gradle cache2 uses: actions/cache@v13 with:4 path: ~/.gradle/caches5 key: ${{ runner.os }}-gradle-${{ hashFiles('**/*.gradle') }}6 restore-keys: |7 ${{ runner.os }}-gradle-
Here’s an example of me adding it to Konfetti an open-source project of mine: ee95bb9
The action will automatically add an extra step to download the Gradle cache (of the previous build) in the beginning of the workflow and when it’s done with the workflow it will automatically upload your cache.
Each repository can store up to 5GB of cache. Or as GitHub puts it:
“A repository can have up to 5GB of caches. Once the 5GB limit is reached, older caches will be evicted based on when the cache was last accessed. Caches that are not accessed within the last week will also be evicted.”
Source: actions/cache
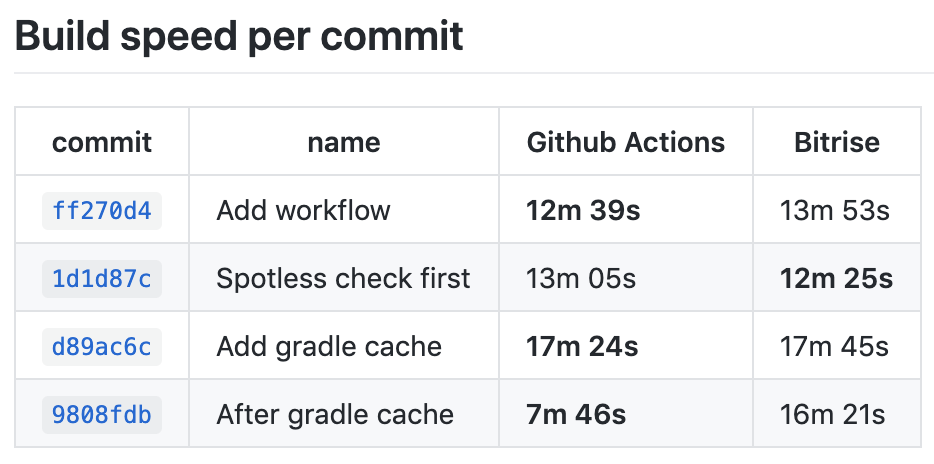
For a larger project where I migrated to Github Actions and added caching I saved up to 5 minutes in build time.

In the image I was migrating a large project from Bitrise to GitHub Actions. After adding the caching we got a consistent 7-8 minute build time.
Using Kotlin in your Gradle files
If you’re using Kotlin in your Gradle files you need to make a small adjustment, see example below:
1- name: Gradle cache2 uses: actions/cache@v13 with:4 path: ~/.gradle/caches5 key: ${{ runner.os }}-gradle-${{ hashFiles('**/*.gradle.kts') }}6 restore-keys: |7 ${{ runner.os }}-gradle-
See how I added .kts to hashFiles(‘*/.gradle.kts’)
That’s it!
Now that I got you up to speed with the basics there’s a lot more that you can do with GitHub Actions. I’d recommend checking out the marketplace with existing actions you could add to your repository or play around with the available triggers to get the most out of GitHub actions and see what works for your codebase(s). You can find more details about this at: events-that-trigger-workflows


